
Meta editing problems… again
Introduction
I am a fan of customizable editors. Over the years, I have tried dozens of editors to create my content, posts, texts, etc. I have spent countless hours editing in emacs, editorial, drafts, scrivener and other less obscure WYSIWYG mainstream editors.
But I always hit a wall, once I need to tailor it to my actual needs for the moment, regardless an existing extension or configuration is available.
Most of the editors live or die because of the communities that surround them. People create countless extensions and customizations to enable different use cases. But what happens if the existing solutions do not work for you?
You end up with a meta problem, a wicked problem that would be solved by creating your own extensions or doing your own customizations. You are no longer spending time writing text, but writing code to make it simpler to make it write text.
After lots of observations, I would say there are two kinds of people: those who make the most of the tools they are given, ignoring any further customizations beyond the basics, and people that love to tinker their environment to the extreme. Tinkering is not a side effect, but a way to approaching any simple task.
The problem of meta-problems
The most obvious concern of these meta problems, is that they deride your attention from your previous task to another boundless domain of expertise. Instead of writing in English, now you are writing in Javascript. Instead of writing your book, now you are making small improvements to your workflow everyday, while the book remains stagnant. It is the ultimate procastination trap!
XKCD has created a few posts over the years, explaining the problem and offering a rationale about devoting time to these automation tasks.
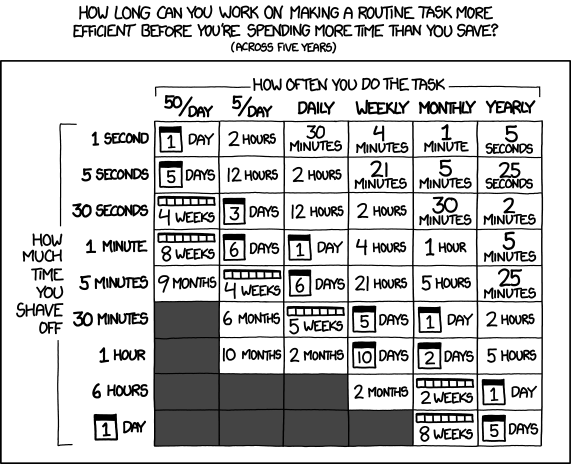

You need to tackle the problem, if and only if it is something you do very often. So what is my current problem?
Capturing images
As I began writing this blog, I stuck into an old problem that I encountered at least twice when using emacs:
How do I capture a segment of the screen and get it into my content as simply and fast as I can?
This problem compounds if you use several operating systems and machines to write your content, as each might have some particular quirks. Nonetheless, there are several steps involved:
- Run a shortcut to capture an area of your screen.
- Switch to your editor or program
- Paste the content into the editor
If you are creating your own notes or documents, you can do these steps by hand and never look back. However, if you plan to publish the results in any meaningfull way, it doesn’t work that well. In my particular case, I work creating online courses, manuals, producing videos and now this blog too. What is the actual problem in each platform? Let’s say you want to publish an article or book and are using a Mac.
Exploring MacOSX workflow
MacOSX offers a built-in tool to capture areas of your desktop easily. You can launch it pressing Cmd+Shift+4. It captures the area you select and save it on your desktop. Fortunately, newer versions allow you to change the default location. File format by default is “Captura de pantalla [fecha] a las [hora].png”. Once the capture is taken, a small thumbnail is displayed in the lower right corner for a few seconds and it disappears.
If you click this thumbnail, you will be able to annotate the screenshot but if you want to do any meaningful changes to it, like changing the name, you have to open it with the QuickView tool. Using this app, you can change the default name and select the directory to save it.
When you are writing a long form document or any document to be edited later by a third party, keeping all files named the same with a timestamp makes it harder. If you need to fix a broken image or retake one of those is much more simpler to locate ‘spyder-help-menu.png’ than ‘captura de pantalla 2022-02-18 a las 11:00’. If you need to process dozens of images and/or need to attribute licensing terms, it suddenly becomes so time consuming.
Using those images for the blog could work in theory, but SEO won’t be happy if all the images in all your posts are called ‘captura de pantalla 20xx-01-01 10:xx’ regardless of the topic. By default, Hugo stores all the images in a single folder, which can make it also hard to maintain.
Focusing on our blog workflow, the simple steps are not so simple or fast anymore. For every single image, now you have to:
- Run a shortcut to capture an area of your screen.
- Click the thumbnail really fast.
- Edit any content on the image if necesary
- Press Cmd+S to save the image
- Select the directory where you store your blog images
- Check if there is a folder named under the name of the blog post you are creating
- Select the folder or create it if it doesn’t exist
- Select an appropiate name for the image
- Press save
- Open the folder again in Finder
- Select the file, click the name and copy the complete name.
- Return to your text editor
- Insert the markdown code to insert an image
- Paste the image name in the center of the brackets
- Write an alt description for the image
There must be a better way to do it!
Exploring the solution with Windows
I am using a desktop app called ShareX that has all kinds of bells and whistles to capture and transform parts of the screen. It can create animated GIFs, short videos, plain captures, annotations. These can be automatically copied to folders, uploaded to the cloud, renamed, etc. But how does it integrate with my editor vscode? It doesn’t.
I started looking for solutions and found the Paste Image extension for VsCode. With this extension, the process is much more simple!
- Launch the capture window action for ShareX (This step copies the image to the clipboard too)
- Switch to vscode
- Select a text as image title.
- Press Ctrl+Alt+V (A markdown link is copied into the text. Image is pasted into the working directory)
This solution seems quite promising! However, it has some initial problems:
- Images are saved to the same directory as the blogposts
- Images are named as YYYY-MM-DD-hh-mm.png
- Image route gets urlEncoded with %20 instead of spaces, dificulting readability.
Fortunately, this extension offers some parameters to change this behavior. You can customize it at the settings.json file or File-> Preferences.
In my case, I changed the Path to save the images in a folder named as the blogpost, under the Hugo static images route. I also made the extension ask me for a filename before saving it to disk. This is my settings.json configuration for Paste Image:
"pasteImage.path": "${projectRoot}/static/images/post/${currentFileNameWithoutExt}",
"pasteImage.basePath": "${projectRoot}/static/",
"pasteImage.showFilePathConfirmInputBox": true,
"pasteImage.filePathConfirmInputBoxMode": "onlyName"
Did everything work? Nope! Now the images do not appear on vscode preview window. There are some old issues related to a similar problem. However the workflow is much more simpler now.
I just need to hightlight some text, press Ctrl+Shift+4. Captured area is copied to clipboard. I switch to vscode, press Ctrl+Alt+Vand vscode prompts to change the file name. Now I just need to replace spaces for hyphens and file gets saved to the right location.
Note: For a detailed description of ShareX and integration with different workflows, you can check this ShareX-User-Manual
Improvements
This workflow suits my needs to create blog posts, but what about other long form formats? I need to test this workflow in more detail to see if it would be suitable too.
On the other hand, there are still a few issues that could be improved:
- When you mark a text to be used as image filename, the text disappears when vscode pastes the markdown code. So you have to write the text again.
- I need to replace manually the spaces in the text for hypens, to prevent vscode from saving the images with spaces in the filenames.
That is, If I hightlight the Test image words in my text and press Ctrl+Alt+V I get a dialog where I have to manually change the file name to Test-image and the original text gets replaced by a link like this:

So I have to move between brackets to copy again the original string again, so it ends up looking like this:

Code for the extension is available on Github but seems unmaintained. There is a fork that seems to be active, but adds additional requirements for all operating systems. One of the longest opened issues is about extension not working in Windows 10.
The MarkdownPaste.Rules section could help with replacing the spaces with hypens. But then I would need to explore RegEx in Typescript. Configuration options seem mostly compatible with minor changes.
How much time do these tasks take vs the time it will save me down the road? I have just spent three hours configuring and writing this post. Let’s add a couple more to test Hugo publishing… I might need to double check the XKCD matrix :)
Photo by Daniele Franchi on Unsplash
Releted Posts

Transcribe videos using OpenAI Whisper for free
Introduction OpenAI, the company behind GPT-3 and DALL-E 2 has just released a voice model called Whisper that can transcribe audio fragments to multiple languages and translate them to English.
Read more
Setting up doom emacs in Ubuntu 20.04
Introduction In this post I will capture the steps required to install doom emacs in a fresh new install of Ubuntu 20.
Read more
Setting up an AI workstation
Introduction In this document, I will share the steps required to get an AI workstation machine ready. I’ll be updating the content as my configuration evolves.
Read more